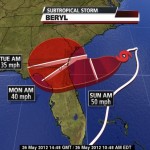
 With tropical storm Beryl bearing down on Jacksonville, we made a late decision yesterday to take the wall down this morning and bring everything back to the studio. At first we were just going to secure things, wrap some tape around the panels or lower the panels to the ground so they are flat. When the mayor cancelled the Jazz Festival for Sunday, it was clear that the storm meant serious business. Also, if everyone was in “take-down” mode, it would be easier to get a truck in and out of the area.
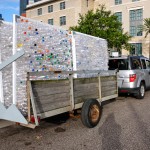
I called Dolf James to confirm our plan and he graciously volunteered the use of his trailer. If you are planning to do any large pieces you need to be able to move your stuff around. It’s great to have friends who have trucks and trailers and are willing to help you move things. Renting a big U-Haul would have been a big pain and expense.
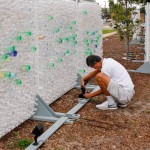
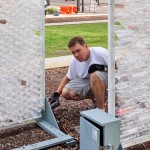
We arrived at the site at about 7:45 and Ryan Buckley was already there, pulling up the anchors and unscrewing the support legs. We could fit 6 panels on Dolf’s trailer, which meant 5 trips to the studio. My brother Robert took care of stripping down the lighting, and our other friend Steve Arrington, helped us carry all the panels to the trailer. Dolf and I shuttled the first load not knowing what roads were opened. As we rounded the corner on Main and Bay, the 3 panels in the back fell over making a huge “crunching” sound. We straightened things up and within 20 feet they toppled again. Dolf pulled out a 12 inch piece of rope and managed to tie a line for support…we bumped our way over the cobblestones on Laura St. and finally arrived at the back entrance to the studio on Hogan. We had tried to secure the panels with a 1×4 screwed across all the frames. As we parked and prepared to unload I realized that I left the drill at the site. We just looked at each other…duh! We had no choice and just pulled the 3 connected panels off the trailer in one piece. They were pretty beat up anyways. Our conclusion was that we had 4 more tries to perfect our technique.
Within 2 hours we broke down and transported the installation back to the studio. It was a good feeling to have everything safe. I’m glad we didn’t go with the plan to leave the panels exposed during the storm. I’m also thankful to have some very competent friends and family who know how to work together. They just made it happen.

Kelvin from WJXT interviewed me during the opening and produced this awesome segment which aired last night. Thanks to all of you who came by during Art Walk, what a great time we all had. More to come with pictures and details, but here is the link to the news segment: http://www.news4jax.com/news/-Message-in-a-Bottle-unveiled-in-Jacksonville/-/475880/12533494/-/1ahi3z/-/index.html

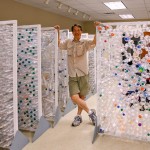
Our opening day is finally here. I’m excited and the wall is looking good. We had a temporary casualty with Dots, but all is fixed now. The titles were glued on last night and we are ready. Last thing is to bring over are the printouts of the word cloud and phrases. It’s been a long journey with this project and an enlightening one. Spending long hours caulking water bottles gives you a lot of time to think. What impressed me the most is the outpouring of support from people everywhere. Truly gratifying.
The Wall takes on a different look depending on the sun, or lack thereof. The morning back light, the high noon brilliance, and the shade of the late afternoon as the shadows of the adjoining buildings cover the park. Then the lights come on and the Wall takes on a new life. My favorite is around 8:00 pm.
I hope those who come to see the Wall will take the time to experience it and feel the presence of the messages. A lot of positive energy here. I hope that visitors will return at different parts of the day. I hope that everyone takes time to reflect on the things that are important to them, and then take action. If the Wall can inspire, motivate, and move the viewer in some way, then I have accomplished my goal with this artwork.

Our official public unveiling of the Wall of Light will be on May 2 during Art Walk in Main Street Park (see map below). The festivities start at 5 pm and normally people are downtown until long after 9 pm. Since it gets dark around 8:15, please plan to stay until the lights go on.
Hope to see a lot of you at the opening and please introduce yourself. The wall will be up until after Memorial Day, May 28.
Google map to the park, located behind the downtown main library on Main Street between Duval and Monroe:
Today we FINALLY got our permit to erect the Wall in Main Street Park. How’s that for last minute? The latest was the paperwork for my insurance, a slight misunderstanding. After almost reaching a point of breakdown, things were clarified and the permit was signed. Yay!
Would we have gone ahead with the installation on Monday w/o a permit? Of course!

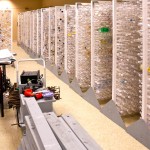
We hosted a “preview” of the panels for April at my studio. Lots of people came by to see where their bottles were going. The original concept for the wall was a single stacked design and now we have gone to individual panels. I think everyone was happy with what they saw. Many thanks to my brother Robert who was here all week to help us get over the hump, finalizing and constructing the support system and wiring the lights. Dorian was also in painting and of course entering bottle messages. It’s all these other details that take time and need to be done right.
Thanks to everyone who attended and we are super excited about the May 2, except that we know there will be some long hours to put in before the opening. Hope to see all of you there!


“Super Messenger” Award of the Week goes to Ms. Tinsley and her Wolfson students who collected over 2000 bottles with messages PLUS another 5000 empty bottles. They are currently working with Dupont Middle School to get another 1000 messages for those empties. Unbelievable effort! I think we’re going to need more caulk!

I’ll start a series of posts for each panel. Here is the first one…

Panel 1 – “Dots”. 433 bottles, 4.5 hours to build. Completed Saturday, March 17.
This is the first panel so I wanted to keep it pretty simple using techniques already tried for the various test walls. It’s easier to leave some gaps so that the various diameter bottles just naturally seem to fit. There is always a certain amount of randomness that you have to accommodate, every bottle is slightly different. It’s also easier to build bottom side down as opposed to sideways because each bottle’s base is slightly wider than the tops (some more so than others). As I was building the first test wall it was evident that the wall was tilting as it grew taller.
Another aspect of the design is the actual color and patterns of the bottles. If you grab whatever is in a single bag and go through that bag entirely before starting on the next, there is a chance that there will not be an even mix of bottle shapes, colors, or cap colors. For most of the designs, I’m after a uniform randomness. Dorian is sorting the bottles into bins so that I can have a handy way to choose the bottles before I start construction.
 “Dots” is named after the pattern of brightly colored caps that are visible on the front face. Only after I finished did I realize the number of blue caps that ended up in the design. Normally, blue is not that common so I was lucky on finding the right bag. The panel was constructed on the floor before I realized how much easier it would be to raise the tray to bench height! I looking forward to the remaining 27 designs.

Today we hit the 10,000 bottle mark with a few more thousand on the way in. We have 1,000 waiting for us to pick up and 3 high schools, Douglas Anderson, Englewood, and Wolfson, are out on spring break this week and they are sending a bunch our way. We are thrilled to have all of these and now we can devote 100% attention to the wall construction, installation, and the opening.
A BIG thanks to Dorian who almost single-handedly recruited, collected, and recorded every bottle for the project. She deserves a medal for this!
Each panel in the wall is 64 x 64 inches. I start with a square cardboard tray that acts as a frame while I assemble the bottles with silicone caulk. I had some cardboard from a previous project and these proved to be handy. I built 2 trays so that a completed panel could be drying and another panel could be under construction. I place the bottles so that what I am seeing is the front of the sculpture, the side facing Main Street.

At first I had the tray on the floor and you can image after doing about 400 squats and bending over, my body was pretty racked after Panel 1 was complete. So I did what every good engineer would do and raised the tray to bench height. Wow, what a difference. With a design in mind, the next step is to gather the bottles you need. This is like harvesting in your garden for your meal. I take bottles from multiple bags so that I can get an even distribution, if that is the intent. Dorian is going to sort the bottles by color and size so that I can manage my “bottle palette”. I also keep an accurate count of the bottles when I select them. I tried to count the bottles after a design is complete and this is impossible.


For each bottle I check to see if any of the sides are dented or crushed. Minor dents can be pushed out with a chopstick (ancient Chinese secret). If the bottle is hopeless I remove the message and use a new bottle. If the bottle is moldy and gross, I set it aside. If the message is readable, I’ll use a new bottle.
If there is moisture in the bottle I’ll remove the cap and let it dry out. If there is no cap I put one on (I have a large collection of bottle caps, all sizes). Sometime the bottle needs to be “burped,” so I just open it to let some air in and close it back up.
After a bottle is deemed good to go I test place it in the design and visually note the contact points to adjacent bottles. It’s important to apply caulk to as many contact points as possible to get a good connection to adjacent bottles, especially in designs like “Confetti” where the bottles are more-or-less randomly placed. Also, caulk does not stick to bottle caps, this I found out on a test model. I guess it is the type of plastic or the fact that oils from the hands may be on it. I’m always playing a little mental game about seeing how accurate I am with the caulk placement. After a while you get pretty good at knowing where to place the caulk. You also try to go for just a little dab, not a big glob…that stuff is expensive! After the bottle is placed you repeat 400 times :).
Each design takes between 300-500 bottles. I want each design to be different so there is no set formula. My current rate of construction is 100 bottles an hour. That’s continuous work. I can usually go for an hour and then it’s break time, at least to get away from the fumes for a while. I have a fan for ventilation, but the smell of curing silicone is pretty bad. Silicone cures by combining with the moisture in the air and it releases acetic acid, the same stuff in vinegar. But I don’t want to get ill over this stuff so I try to get lots of fresh air.

I let a tray cure until I finish the next panel, which is always more than a day. Then I slide the mass of bottles out of the tray to an adjacent area where I mount the holding strips. By this time the whole mass acts as a single unit. I use a 4 ft piece of vinyl corner bead (the stuff they use for drywall corners) and caulk it to each side. This is used as a “tab” that allows me to screw the bottles into the wooden frame. After the holding strips have cured, I lay a wooden frame over the bottles and place clamps on two of the sides so I can raise the whole frame and bottles together. Then I screw the holding strip to the wooden frame and voila, it’s complete!


